
Status: alpha.
- [+] submits listens while online
- [+] provides UI to configure user name and token
- [-] no checks for online status, no exception handling
- [-] no caching of the listens history while offline
- [-] configurable server url
- [-] no separate thread for network requests
gitlab.com/ykBuilds/foo_listenbrainz
Tag Archives: foobar

Adding Songs To Foobar2000’s Media Library
When you first install Foobar2000, you’ll need to set up the Media Library. The library function monitors your music folders and allows you to access and manage your audio files. The better the accuracy of the filenames and the metadata, the more accurate the library catalog functions will work. You only need to add the main top folder. You can also add additional main folders in other locations.
File > Preferences > Media Library > Music Folders > Add…

Adding audio files to your Music folder will automatically be included into your library. You can also directly point Foobar2000 to new folders or files via the Files menu.
Share this:

Find & Play ~ Foobar2000 Music Search Extension
Feature rich plug-in for foobar2000 that finds and plays music. Works great with youtube and your own media library.
Features:
Display & Play:
- full album and track discographies
- top tracks, similar artists, similar songs, decades
- top 100 charts (current and historic back to 1952)
- can use queries or track matching with last.fm tag database (so files don’t need to be tagged in any special way to identify tracks of specific genres, mood or artist locale)
Auto DJ:
- auto DJ option with automated weighting algorithmn that can use last.fm or own data to help select better tracks
Other features:
- operates on a minimum number of playlists, so there’s no awkward playlist management
- nowplaying pane that provides feedback or displays configurable info on current track
github.com/Wil-B/Find-and-Play/releases
hydrogenaud.io/index.php/topic,121006.0.html
Share this:

Foobar2000 ~ Playlists & Autoplaylists
Playlists, or named lists of songs, are an essential aspect of Foobar2000. Whenever you add a song to Foobar, you are adding it to one of Foobar’s playlists. Foobar allows you to create and maintain different playlists, which are just entitled lists of your audio tracks (files). The playlists link to audio files in a ‘many to one’ relationship; that is, there can be many tracks on different playlists that reference the same audio track. Foobar can import and exports playlists in a variety of formats; and stores its own playlists as .fpl files. (This is different from adding a song to your Foobar2000 Library).
Playlists can be created manually by adding individual songs, or automatically by specifying a set of conditions in a query with the result displayed as an “Autoplaylist”. Manually created playlists are static, they don’t change unless you change them; Autoplaylists are dynamic, that is the results may change whenever the Autoplaylist is queried.
Playlists created manually can be edited directly, while Autoplaylists are edited by modifying the query. However, you can save the results of an Autoplaylist as a new static, and therefore editable, playlist.
Creating an Autoplaylist of an Albumlist item like genre:
- Select
by genrefrom the Albumlist view selector - Select a genre from the list of genres
- Right click that selected genre and select
Create Autoplaylist
You will now have a new Autoplaylist listed on the playlist manager tab with the name of the genre you selected. Playlists created this way are called an Album List branch.
Creating an Autoplaylist of a folder’s contents:
- Select the
Searchtab - enter
%path% HASreplace this with the actual path in the search field - Select
... - Select
Create Autoplaylist - Rename the new playlist (hint, with the path)
AutoPlaylist query examples:
- Lossless ~ “$info(encoding)” IS lossless
- Lossy ~ “$info(encoding)” IS lossy
- Missing title ~ title MISSING (no percent signs)
- Missing genre ~ genre MISSING
- Never played ~ %play_count% MISSING
- No Dynamic Range info ~ %dynamic_range_album% MISSING
- No ReplayGain info ~ %replaygain_track_gain% MISSING
- No Artist info ~ %path% HAS album AND album artist MISSING
- Played often ~ %play_count% GREATER 9
- Randomly sorted ~ ALL SORT BY “$rand()”
- Recently added ~ %added% DURING LAST 1 WEEKS
- Recently played ~ %last_played% DURING LAST 1 WEEK
- Recently modified ~ %last_modified% DURING LAST 2 WEEKS
Foobar Playlist Management Components:
- foo_new_playlist replicates the regular “New playlist” command with a customizable pattern in advanced configuration using %always_counter% and %maybe_counter% to enumerate possible names.
- <a hrefoo_pl_push” target=”_blank” rel=”noopener”>foo_pl_push automatically saves playlists when changed … including new JSON format to share on the web. automatically saves playlists … including new JSON format for the web.
- foo_playlist_revive replaces old file paths with new file paths. v1.x
- foo_playlist_fix replaces dead playlist items based on title formatting v2.x
- foo_softplaylists creates different Last.fm related playlists.
- foo_utils allows inactive playlists to be edited or protected from editing.
- foo_xspf_1 ~ Import / Export XML & XSPF playlists
- Playlist_Bind binds a folder to a playlist.
- Playlist Attributes allows attributes to be added to playlists.
- Playlist Dropdown displays playlists in a drop down menu.
- Playlist History maintains a playlist history.
- Playlist Organizer organizes your playlists in a treeview fashion.
- Playlist Tour is an updated version of Playlist History for Foobar2000 v.2.x
- Random Pools creates random dynamic playlists.
- Remove Playing Track ~ Removes the playing track from the playing playlist and optionally advances playback.
- SimPlayList Manager has playback status icons, smooth scrolling, and statistics.
Additional resources:
Building Autoplaylist queries ~ Foobar2000: Query Syntax
Formatting playlist contents ~ Title Formatting Introduction
Adding Playlist Headers ~ Playlist Grouping Schemes
Share this:

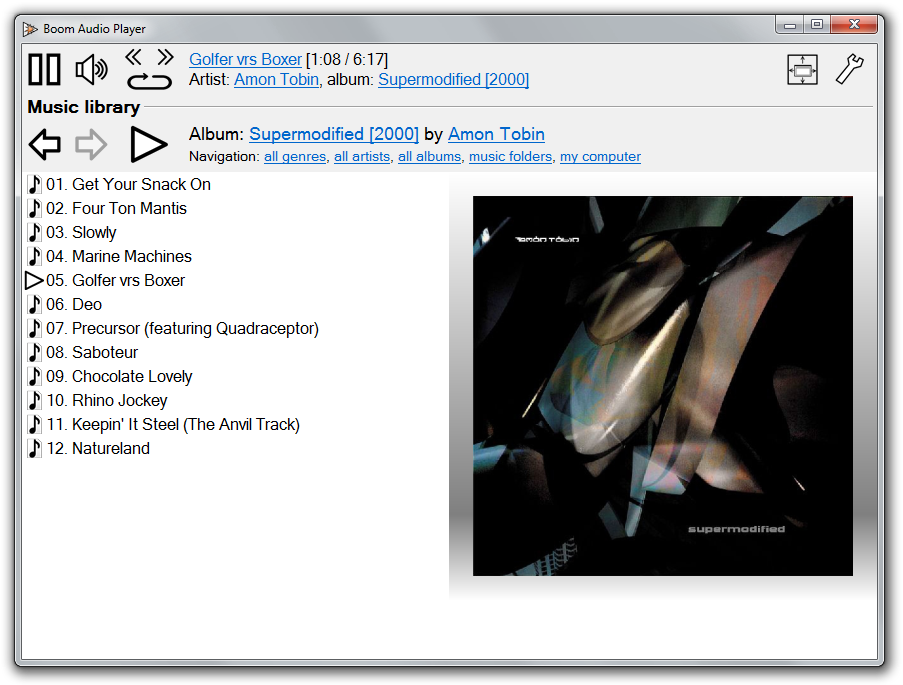
Boom Audio Player ~ Foobar2000 Simplified
Frome the same developer who brought you Foobar2000 comes Boom.
Boom is an easy to use audio player intended for casual computer users who do not wish to spend their time on figuring more sophisticated software out. All of its most important features are easily accessible out-of-the-box.
Features:
- No installation or administrator rights required! Just download and run.
- Gapless playback of properly encoded files. Enjoy smooth transitions between tracks.
- ReplayGain support. External software is currently required to write ReplayGain information to file tags to utilize this functionality.
- Contents of your music folders are shown, in a convenient structured genre/artist/album/song view.
- By default, contents of “my music” folder or Windows Music library folders are shown. You can configure Boom to index music from any other folders though.
- You can install Boom to removable media and have it index contents of the folder it is installed in.
- Are your files badly tagged or missing tags all together? No problem, Boom can browse your music library by its folder structure.
- Supports variety of popular audio formats, including: MP3, Ogg Vorbis, FLAC, Musepack (MPC), WavPack, WAV, AIFF, MP4/M4A, WMA.
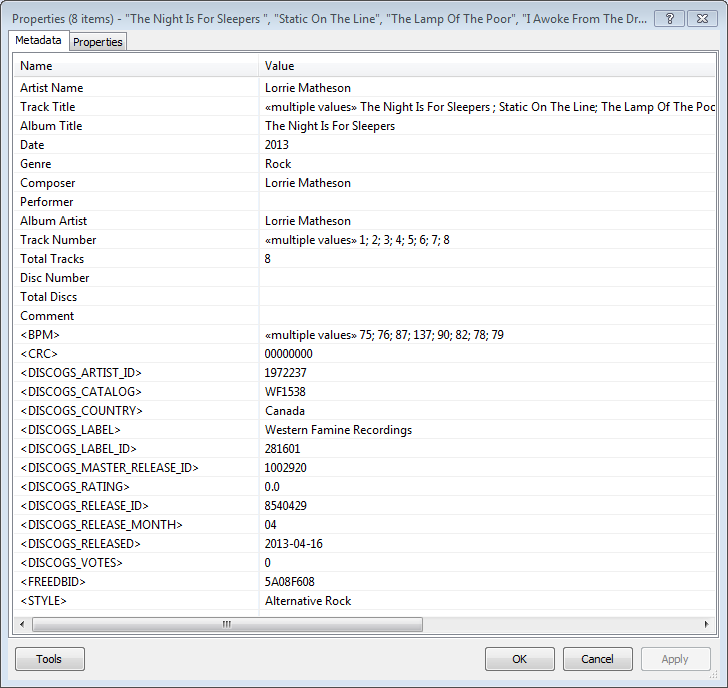
- For emergency tagging needs, Boom includes a simplified version of the foobar2000 Properties dialog.
- Easily configured to run from removable media.
- Multi-language support.
perkele.cc/software/boom
apps.microsoft.com/detail/9NQNS46R8T75
Share this:

foo_playcount ~ Foobar2000 Playback Stats
You can extend Foobar2000 functionality by increasing the information the player maintains. Installing the foo_playcount component allows Foobar to both keep track of additional data, and adds the following user available fields:
- Date and time a track was first played ~ %first_played%
- Date and time a track was last played ~ %last_played%
- The number of times a track has been played ~ %play_count%
- Date and time a track was first added to the Media Library ~ %added%
- Song rating ~ %rating%
Song Rating Playlist Display
The songs rating can now be displayed in a playlist viewer in two ways:
- On a 1 to 5 scale with %rating%
- Displayed as up to five stars, “★★★”, with %rating_stars%
- Displayed as five stars, “★★★☆☆”, with %rating_stars_fixed%
Note: This component should be installed at the same time as Foobar2000, if your goal is to have a complete play count history.
Discussion
Download
Documentation
Display (Title) Formattingplaylist viewer
foo_playcount_2003
This component uses the same database backend that foo_playcount utilises for logging plays but has many more advanced features and fewer limitations.
- Playcounts and dates can edited for any context menu selection.
- Data can be imported from file tags or fields provided by other components.
- Ratings up to 10 are supported.
- You can customise how long you have to listen before a play count is incremented.
- The current time is available via title formatting as a full date time string or Unix timestamp.
- First played, last played and added are all available as Unix timestamps.
- How records are bound to tracks can be configured in the
Advanced Preferences.
marc2k3.github.io/component/playcount-2003
Share this:

Foobar2000 ~ Playing CDs With Pre-emphasis
Pre-emphasis & CDs
Although rarely used, there exists the capability for standardized emphasis in Red Book CD mastering. As CDs were intended to work on 14-bit audio, a specification for ‘pre-emphasis’ was included to compensate for quantization noise. After production spec was set at 16 bits, quantization noise became less of a concern, but emphasis remained an option through standards revisions. The pre-emphasis is described as a first-order filter with a gain of 10 dB (at 20 dB/decade) and time constants 50 μs and 15 μs ~ http://en.wikipedia.org/wiki/Emphasis_(telecommunications)#Red_Book_Audio
Emphasis came about because of early converter design. The entire sampling process was new, and A to D converters exhibited low level noise because of bad linearity in the conversion process. This process added some high frequency broadband noise to the digital signal. Manufacturers overcame this byproduct by boosting (emphasis) the high frequencies during the conversion from analog to digital, and then rolling off (de-emphasis) the high frequencies by the same amount after the conversion back from digital to analog. This process was optional and there was a switch to select emphasis on each track during record. A flag was set in the digital bit-stream, which automatically activated de-emphasis during playback. All CD players, DVD players, and DAT machines detect this flag and turn on a high frequency roll-off in the analog domain during playback. If the digital signal contains emphasis and the flag is missing or turned off, then the roll-off does not occur and the audio will be brighter than normal.
This emphasis feature was the biggest reason why different CD players sounded different when playing back the same CD, or DAT machines differed playing back the same DAT tape. The digital part and the conversion to analog were basically the same in all of the machines. The de-emphasis circuit was implemented in the analog domain using the least expensive circuit to perform the operation. There was high-end EQ on the output of every digital playback device, and there was no standard or calibration for how it was performed. If you played back a CD without emphasis, then all of the CD players sounded pretty much the same. If you played a CD with emphasis, then each playback device sounded very different from every other player.
Producers and engineers started turning off the emphasis switches. Converters were getting better so there was less converter noise, and the use of de-emphasis circuits was eliminated. ~ Roger Nicolls
As I understand it, the Redbook CD standard calls for decoding of pre-emphasis flags. So any player bearing the CD format logo should handle pre-emphasis discs properly. ~ http://forums.stevehoffman.tv/threads/whats-pre-emphasis.49396/#post-971902
Working with CDs with pre-emphasis
Foobar plugins to de-emphasis pre-emphasized CDs:
- Postprocessing (foo_deemph): works only with lossless sources; always active during playback and ReplayGain scan.
- * DSP plugin (foo_dsp_deemph): works with any source
Download ~ http://wiki.hydrogenaud.io/index.php?title=Pre-emphasis
Use post-processing if you want to add correct ReplayGain tags to your files.
Use DSP if you have lossy files that you want to de-emphasize.
Otherwise, there’s no difference. ~ http://hydrogenaud.io/index.php/topic,99394.50.html
Lists of CD’s with pre-emphasis:
http://www.studio-nibble.com/cd/index.php?title=Pre-emphasis_(release_list)
http://www.discogs.com/lists/CDs-with-pre-emphasis-my-collection-only/243100
http://www.discogs.com/lists/CDs-suspected-to-have-pre-emphasis/308012
Share this:

foo_plorg ~ Playlist Organizer With Folders
The Foobar2000 Playlist Organizer component allows playlists to be organized into folders.
- Install the foo_plorg component
- Add a new panel or tab, then add
Playlist Organizer

Importing playlists using foo_plorg and foo_playlist_revive
- Install foo_playlist_revive
- Drag playlist files and drop on the Playlist Organizer panel
- Select
Edit > Revive Dead Items
Note: The imported playlist will have the same name as the original playlist filename.
Resources:
Website
Documentation – Hydrogenaudio
foo_playlist_revive – Hydrogenaudio
Foobar2000 – How to install a component
Share this:

foo_discogs ~ Foobar2000 & Discogs
Greatly extend the information in your music files by using the foo_discogs component to tag albums with Discogs information. Once the additional Discogs release information is stored in the song tags, it’s possible to search for catalog numbers, secondary artists or studios, etc. You can now also create toolbar buttons which open the corresponding artist or release pages in Discogs, the artist’s own website or other links.
- download Discogs album and artist artwork
- retrieve more information than most taggers
- goes that extra length to make sure retrieved data is correct and well formatted
- flexible tag mapping allows you to write only what you want, where you want
- use meta-data in tags to display Discogs artist / label / release web pages
able to later update specified tags (useful in update ratings)
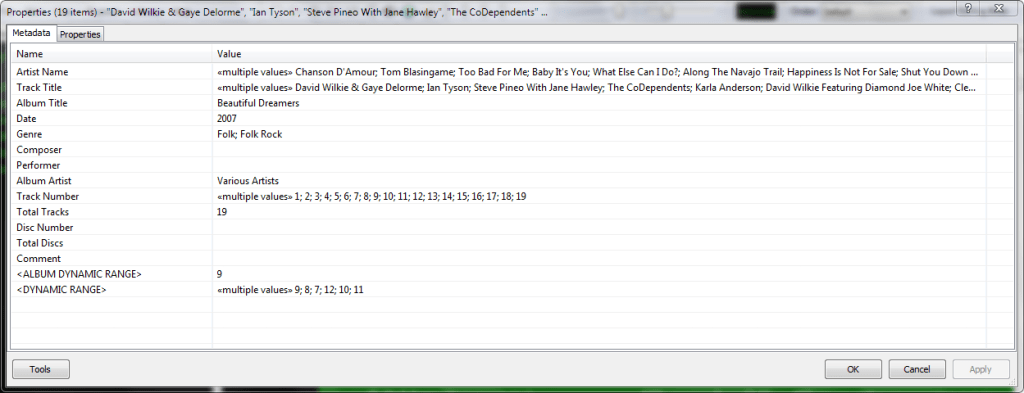
Album’s properties when tagged with Discogs info
Installing & Configuration:
- Install the foo_discogs component
- Select any song on any playlist
- Right click the song and select Tagging
- From the sub-menu select Discogs
- Now select Configuration
- Change any settings needed.
Tagging Files:
- Select an entire album on a playlist
- Right click the album and select Tagging
- Select Discogs
- Select Write Tags…
- Click Search then select the correct match and click Next
- Confirm that the tracks match the files and click Write tags
Your audio files should now be tagged with additional Discogs metadata.
Open Release Page Button:
- Right click on Foobar’s Toolbar area and select “Customise Buttons…“
- In “Available Commands” navigate to and select [context] > Tagging > Discogs > View Release Page
- Change Icon and then click “OK“
- Select a song, or album that has been tagged with Discogs metadata, and click the new custom button
References:
www.foobar2000.org/components/view/foo_discogs
hydrogenaud.io/index.php/topic,50523.0.html
Latest update:
github.com/ghDaYuYu/foo_discogs
bitbucket.org/fooDaYuyu/foo_discogs/downloads/
Share this:

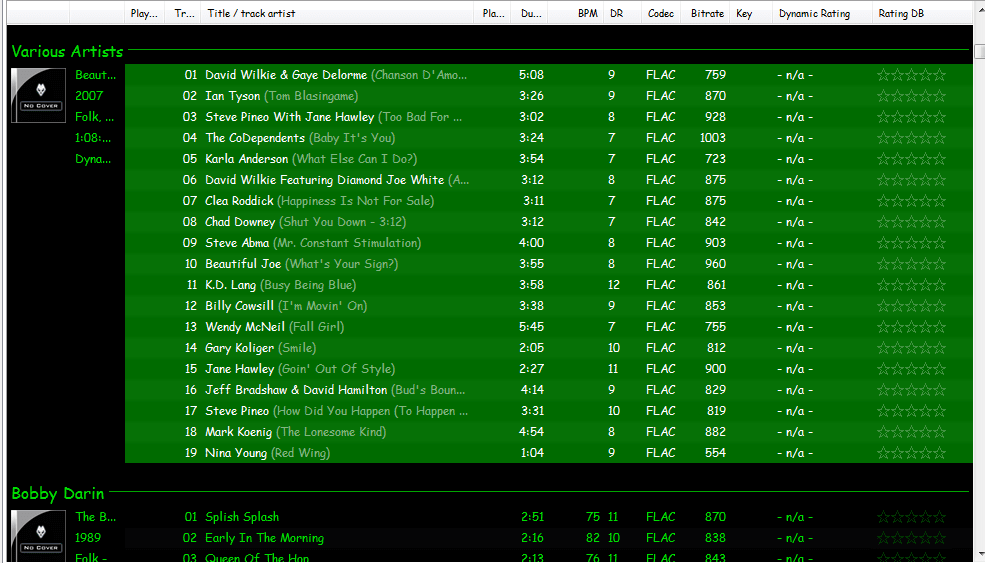
Foobar2000 ~ Playlist Viewers
Foobar2000 Playlist Viewers display the current playlist of songs. Different playlist viewers offer various capabilities such as formatting, grouping and visual options. A playlist viewer is usually the central panel and main focus of a Foobar2000 interface. Foobar2000 plays the next song of the current playlist unless the play order has been changed from default, to repeat, random or shuffle. There is a playback queue but it is not visible or used in normal operation.
- Default Playlist
- EL Playlist (Extended List Playlist / Eole Playlist, CUI)
- ES Playlist (Extended Simple Playlist, DUI)
- JS Playlist (jscript playlist for WSH PANEL MOD)
- mtpl Playlist (supports folders, playlist in playlist and sub-tracks)
- SimPlaylist (multiple grouping levels, album art, etc.)

Adding a custom column to a playlist view: (using play count as an example)
- When adding a column view in a playlist, you’ll need to define the column first.
- Navigate to
Preferences > Display > Default User Interface > Playlist View > Custom Columns - at the bottom of the custom columns windows, click “
Add new‘ - Name the Column “
Played‘ and%play_count%as the ‘pattern’ - click apply, ok
- Now right click the title bar of the playlist and select “
Columns” and make sure ‘Played‘ is selected (checkmarked) and that you can see the column in the playlist, it will be last but you can rearrange it.
Resources:
Configuring the default playlist viewer
Share this:

Foobar2000 Tagging ~ Fixing Swapped Artist | Title Tag Info
Do you have albums where the artist’s names are in the track title field, and the title of the track is in the artist name field? Here’s how to fix this.
Start by checking the file names. If the file names have both artist name and track title information, then the fix is easy, just retag the files using the Automatically fill values function.
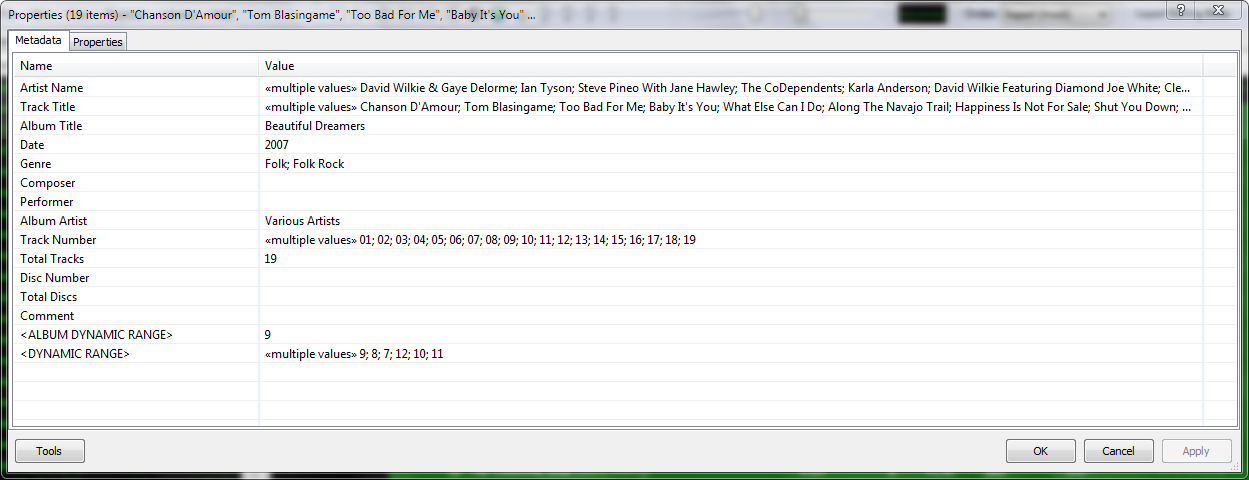
First, select the files, then open the Properties dialog window.
Right click and select Automatically Fill Values…

Then with the source set to File names, fill in or select a Pattern which puts the information in the correct fields.
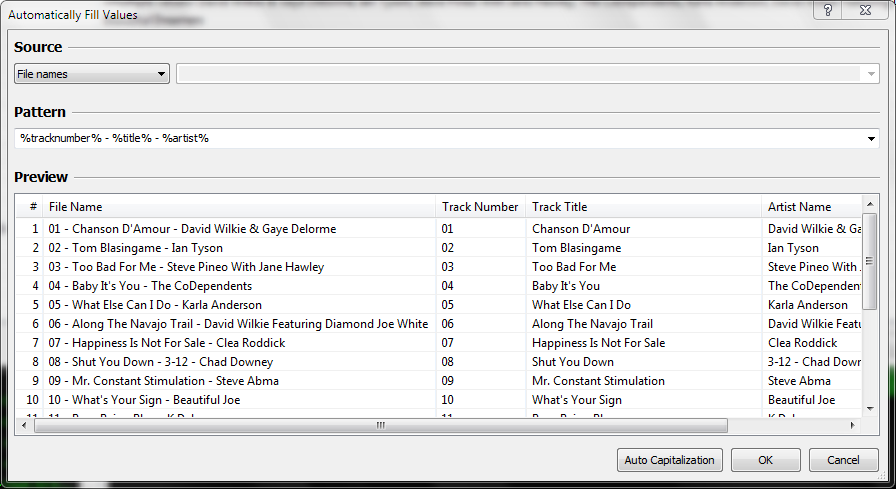
After you select Ok, Foobar will retag the files properly.
However, if the file names don’t contain both artist names and track title information, you’ll have to rename the files from the tags first. Select the files then right click and select File Operations>Rename
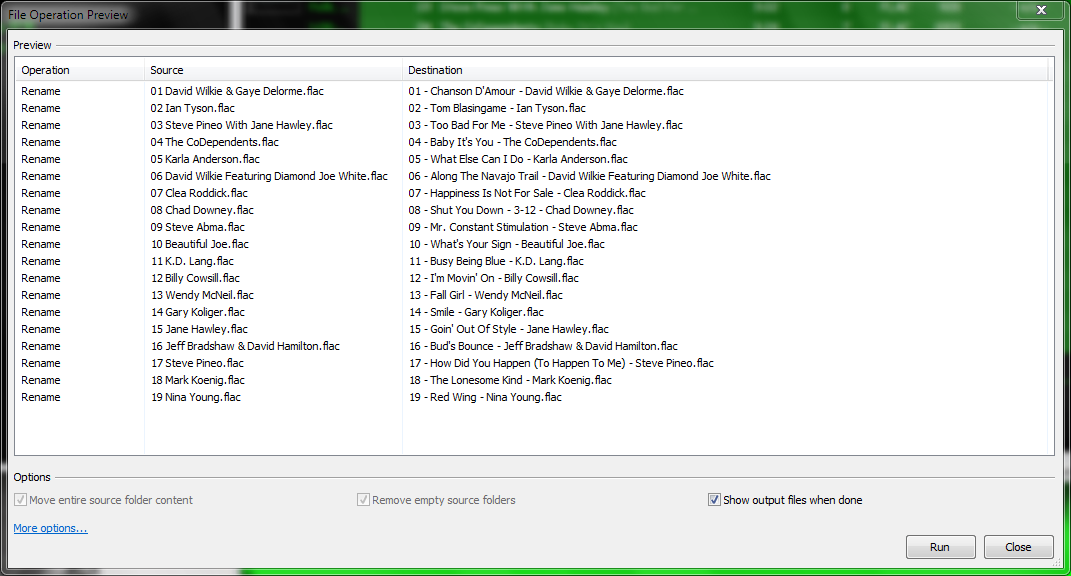
and after the files have been renamed, carry out the rest of the above procedure.
Share this:

Foobar2000 ~ How To Install A Component
Add-on components greatly extend the appearance and functionality of Foobar2000.
- Open the Foobar Preferences dialog (File | Preferences or press CTRL+P)
- Go to the Components page (click components at the top of the list)
- Click the “Install…” button and select the component archive (zip) file, or drag the component’s file to the
Installed componentslist box. - Press “OK“, you will be prompted to restart foobar2000 in order to load the newly installed component.
- If the component has a visual element, you’ll need to add the component to the DUI (Default User Interface) now. Toggle View\Layout\Enable Layout Editing Mode and then add a new panel or tab. Right click the new panel or tab area and select “Add New UI Element …“, then select the new component from the list. You may need to adjust borders to fit. Exit layout mode.

Foobar2000: How to install a component
Additional Resources:
List Of Foobar Components
New Feature Monitor ~ foo_whatsnew

