Show full script
'use strict';
/*
====================================================
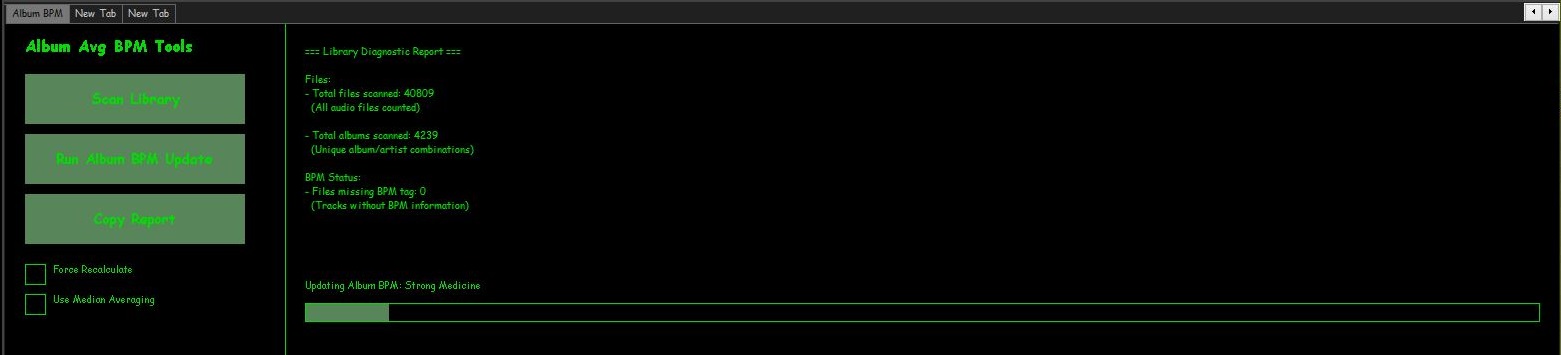
Album Average BPM Panel - FULL PRO v5
- Immediate feedback for buttons
- Status line in report section
- Progress bars appear immediately
- Logs skipped files
- Inconsistent albums listed
====================================================
*/
function RGB(r,g,b){ return (0xff000000 | (r<<16) | (g<<8) | b); }
////////////////////////////////////////////////////
// TitleFormats
////////////////////////////////////////////////////
const tf_album = fb.TitleFormat("%album%");
const tf_albumArtist = fb.TitleFormat("%album artist%");
const tf_artist = fb.TitleFormat("%artist%");
const tf_bpm = fb.TitleFormat("%bpm%");
const tf_existing = fb.TitleFormat("%album_avg_bpm%");
////////////////////////////////////////////////////
// UI Colours + Font
////////////////////////////////////////////////////
function getUIColours(){
try{
return { bg: window.GetColourDUI(1), text: window.GetColourDUI(0), accent: window.GetColourDUI(2) };
}catch(e){
return { bg: RGB(30,30,30), text: RGB(255,255,255), accent: RGB(0,200,0) };
}
}
function getUIFont(){ try{ return window.GetFontDUI(0); } catch(e){ return gdi.Font("Segoe UI",13,0); } }
////////////////////////////////////////////////////
// Library cache
////////////////////////////////////////////////////
let libHandles = null;
function loadLibraryOnce(){ if(!libHandles) libHandles = fb.GetLibraryItems(); }
////////////////////////////////////////////////////
// State
////////////////////////////////////////////////////
let runningUpdate=false;
let reporting=false;
let updateIndex=0, updateTimer=0;
let reportIndex=0, reportTimer=0;
let currentAlbum="Idle", currentFile="";
let updates=0;
let totalFiles=0, totalAlbums={};
let missingBPM=0, zeroBPM=0, missingAlbumAvg=0;
let minBPM=999999, maxBPM=0;
let albumConsistency={}, inconsistentAlbums=0;
let skippedFiles=[];
let forceRecalc=false, useMedian=false;
////////////////////////////////////////////////////
// Layout
////////////////////////////////////////////////////
const LEFT_WIDTH = 280;
const buttonScan={x:20,y:50,w:220,h:50};
const buttonUpdate={x:20,y:110,w:220,h:50};
const buttonCopy={x:20,y:170,w:220,h:50};
const checkboxForce={x:20,y:240,size:20};
const checkboxMedian={x:20,y:270,size:20};
////////////////////////////////////////////////////
// Album BPM Update Logic
////////////////////////////////////////////////////
let albumsMap=[];
function buildAlbums(){
loadLibraryOnce();
albumsMap = [];
let map={};
for(let i=0;i400) continue; // Filter extreme BPMs
let groupingArtist = albumArtist ? albumArtist : artist;
let key = groupingArtist+"|||"+album;
if(!map[key]){
map[key]={ handles:new FbMetadbHandleList(), sum:0, count:0, hasExisting:true, existingValues:{} };
}
map[key].handles.Add(h);
map[key].sum += bpm;
map[key].count++;
let albumAvg = tf_existing.EvalWithMetadb(h);
if(albumAvg) map[key].existingValues[albumAvg]=true;
if(!albumAvg) map[key].hasExisting=false;
}
albumsMap = Object.values(map);
}
function stopUpdateTimer(){ if(updateTimer){ window.ClearInterval(updateTimer); updateTimer=0; } }
function processUpdateNext(){
if(!runningUpdate) return;
if(updateIndex>=albumsMap.length){
runningUpdate=false;
stopUpdateTimer();
currentAlbum="Finished";
fb.ShowPopupMessage("Album BPM Update Finished. Updated Albums: "+updates);
window.Repaint();
return;
}
let data = albumsMap[updateIndex++];
currentAlbum = tf_album.EvalWithMetadb(data.handles[0]);
// Determine if update needed
let inconsistent = Object.keys(data.existingValues).length > 1;
if(!forceRecalc && !inconsistent) return;
let avg=0;
if(useMedian){
let arr=[];
for(let i=0;i<data.handles.Count;i++){
let val=parseFloat(tf_bpm.EvalWithMetadb(data.handles[i]));
if(!isNaN(val) && vala-b);
let mid=Math.floor(arr.length/2);
avg = arr.length%2===0 ? (arr[mid-1]+arr[mid])/2 : arr[mid];
}else{
avg = data.sum / data.count;
}
avg = avg.toFixed(2);
let json=[];
for(let i=0;i<data.handles.Count;i++){
try{
json.push({"ALBUM_AVG_BPM":avg});
}catch(e){
skippedFiles.push(data.handles[i].Path);
}
}
try{
data.handles.UpdateFileInfoFromJSON(JSON.stringify(json));
updates++;
}catch(e){
for(let i=0;i0){
currentAlbum = tf_album.EvalWithMetadb(albumsMap[0].handles[0]);
}
window.Repaint();
updateTimer = window.SetInterval(processUpdateNext,100);
}
////////////////////////////////////////////////////
// Report Logic
////////////////////////////////////////////////////
let reportText="Press Scan Library.";
function stopReportTimer(){ if(reportTimer){ window.ClearInterval(reportTimer); reportTimer=0; } }
function processReportNext(){
if(!reporting) return;
let batch=500;
for(let c=0;c<batch && reportIndex0){
if(bpmmaxBPM) maxBPM=bpm;
}
}
if(!albumAvg) missingAlbumAvg++;
if(!albumConsistency[key]) albumConsistency[key]={};
if(albumAvg) albumConsistency[key][albumAvg]=true;
currentFile = groupingArtist+" - "+album;
}
if(reportIndex>=libHandles.Count){
reporting=false;
stopReportTimer();
inconsistentAlbums=0;
let inconsistentList=[];
for(let k in albumConsistency){
let vals=Object.keys(albumConsistency[k]);
if(vals.length>1){
inconsistentAlbums++;
if(inconsistentList.length0?inconsistentList.join("\n"):"None"}
Skipped / Inaccessible Files:
${skippedFiles.length>0?skippedFiles.join("\n"):"None"}
Current Status: Idle
BPM Range:
- Lowest BPM found: ${minBPM===999999?"N/A":minBPM}
- Highest BPM found: ${maxBPM}`;
}
window.Repaint();
}
function startReport(){
if(reporting) return;
loadLibraryOnce();
reportIndex=0;
totalFiles=0; totalAlbums={};
missingBPM=0; zeroBPM=0; missingAlbumAvg=0;
minBPM=999999; maxBPM=0; albumConsistency={};
skippedFiles=[];
reporting=true;
reportText="Scanning library...";
// show first file immediately
if(libHandles.Count>0){
currentFile = tf_album.EvalWithMetadb(libHandles[0]) || "(No Album)";
}
window.Repaint();
reportTimer = window.SetInterval(processReportNext,10);
}
////////////////////////////////////////////////////
// Drawing
////////////////////////////////////////////////////
function drawButton(gr,b,label,ui,font){
gr.FillSolidRect(b.x,b.y,b.w,b.h,ui.accent);
gr.DrawString(label,gdi.Font(font.Name,14,1),ui.text,b.x,b.y,b.w,b.h,0x11000000);
}
function drawCheckbox(gr,c,label,state,ui,font){
gr.DrawRect(c.x,c.y,c.size,c.size,1,ui.text);
if(state) gr.FillSolidRect(c.x+4,c.y+4,c.size-8,c.size-8,ui.accent);
gr.DrawString(label,font,ui.text,c.x+28,c.y-2,300,24,0);
}
function on_paint(gr){
let ui=getUIColours();
let font=getUIFont();
let titleFont=gdi.Font(font.Name,16,1);
gr.FillSolidRect(0,0,window.Width,window.Height,ui.bg);
// LEFT PANEL
gr.DrawString("Album Avg BPM Tools",titleFont,ui.text,20,10,LEFT_WIDTH,30,0);
drawButton(gr,buttonScan,"Scan Library",ui,font);
drawButton(gr,buttonUpdate,"Run Album BPM Update",ui,font);
drawButton(gr,buttonCopy,"Copy Report",ui,font);
drawCheckbox(gr,checkboxForce,"Force Recalculate",forceRecalc,ui,font);
drawCheckbox(gr,checkboxMedian,"Use Median Averaging",useMedian,ui,font);
gr.DrawLine(LEFT_WIDTH,0,LEFT_WIDTH,window.Height,1,ui.text);
// RIGHT PANEL - report text
let statusText = reporting ? "Scanning: "+currentFile : runningUpdate ? "Updating Album BPM: "+currentAlbum : "Idle";
let reportWithStatus = reportText.replace("Current Status: Idle","Current Status: "+statusText);
gr.GdiDrawText(reportWithStatus,font,ui.text,
LEFT_WIDTH+20,20,
window.Width-(LEFT_WIDTH+40),
window.Height-160,0); // leave 160px for progress bars
// Progress bars
const barHeight = 18;
const margin = 8;
const barYUpdate = window.Height - 2*barHeight - 2*margin;
const barYScan = window.Height - barHeight - margin;
if(runningUpdate){
let prog=Math.floor((updateIndex/albumsMap.length)*(window.Width-LEFT_WIDTH-40));
gr.FillSolidRect(LEFT_WIDTH+20,barYUpdate,prog,barHeight,ui.accent);
gr.DrawRect(LEFT_WIDTH+20,barYUpdate,window.Width-LEFT_WIDTH-40,barHeight,1,ui.text);
gr.DrawString("Updating Album BPM: "+currentAlbum,font,ui.text,LEFT_WIDTH+20,barYUpdate-25,window.Width-LEFT_WIDTH-40,20,0);
}
if(reporting){
let prog=Math.floor((reportIndex/libHandles.Count)*(window.Width-LEFT_WIDTH-40));
gr.FillSolidRect(LEFT_WIDTH+20,barYScan,prog,barHeight,ui.accent);
gr.DrawRect(LEFT_WIDTH+20,barYScan,window.Width-LEFT_WIDTH-40,barHeight,1,ui.text);
gr.DrawString("Scanning: "+currentFile,font,ui.text,LEFT_WIDTH+20,barYScan-25,window.Width-LEFT_WIDTH-40,20,0);
}
}
////////////////////////////////////////////////////
// Mouse
////////////////////////////////////////////////////
function on_mouse_lbtn_up(x,y){
if(hit(buttonScan,x,y)) {
startReport();
reportText = "Scanning library...";
currentFile = libHandles.Count>0 ? tf_album.EvalWithMetadb(libHandles[0]) || "(No Album)" : "Idle";
window.Repaint();
}
if(hit(buttonUpdate,x,y)) {
startUpdate();
currentAlbum = albumsMap.length>0 ? tf_album.EvalWithMetadb(albumsMap[0].handles[0]) : "Preparing update...";
window.Repaint();
}
if(hit(buttonCopy,x,y) && reportText){
utils.SetClipboardText(reportText);
fb.ShowPopupMessage("Report copied to clipboard.");
}
if(hitSquare(checkboxForce,x,y)){ forceRecalc=!forceRecalc; window.Repaint(); }
if(hitSquare(checkboxMedian,x,y)){ useMedian=!useMedian; window.Repaint(); }
}
function hit(b,x,y){ return x>=b.x && x=b.y && y=c.x && x=c.y && y<=c.y+c.size; }