Buzz transcribes and translates audio to text offline using OpenAI’s Whisper. Import audio and video files into Buzz and export them as TXT, SRT, or VTT files. Buzz supports Whisper, Whisper.cpp, Faster Whisper, Whisper-compatible models from the Hugging Face repository, and the OpenAI Whisper API.
Features:
Transcribe audio and video files or Youtube links
Live realtime audio transcription from microphone
Presentation window for easy accessibility during events and presentations
Speech separation before transcription for better accuracy on noisy audio
Speaker identification in transcribed media
Multiple whisper backend support
CUDA acceleration support for Nvidia GPUs
Apple Silicon support for Macs
Vulkan acceleration support for Whisper.cpp on most GPUs, including integrated GPUs
Export transcripts to TXT, SRT, and VTT
Advanced Transcription Viewer with search, playback controls, and speed adjustment
Keyboard shortcuts for efficient navigation
Watch folder for automatic transcription of new files
Command-Line Interface for scripting and automation
MODICIA O.S. is a complete multimedia workstation for creatives, professionals, and curious users. Runs live from USB with no installation required. Stable, multilingual, and packed with ready-to-use tools.
✨ Key Features
🔃 Live system — boot from USB without modifying your PC
🎥 Multimedia suite — video, audio, graphics, photography
🗂 Office suite — documents and business tools
🧰 Curated software — no duplicates, no broken tools
🖥 Optimized interface — compact layout with visual alerts
🌍 Multilingual — over 30 languages supported
🛡 Invisible fallback logic — safety and stability
🔗 Clickable license buttons — semitransparent, linking to local control files
🎯 Ideal Users
🎬 Filmmakers, editors, streamers
🎧 Musicians, podcasters, sound designers
🎨 Designers, illustrators, photographers
🧑🏫 Teachers, writers, office professionals
🧑💻 Students and beginners
🐧 Open source users seeking localization and compliance
📦 Included Applications (Examples)
Category Applications
🎞 Video Kdenlive, Shotcut, OBS Studio
🎚 Audio Audacity, Ardour, LMMS
🖌 Graphics GIMP, Inkscape, Krita
📷 Photo Darktable, RawTherapee
📝 Office LibreOffice, PDF Studio
🌐 Web Firefox ESR, Thunderbird, FileZilla
🧹 Utilities GParted, Timeshift, BleachBit
🚀 How to Use
📥 Download the ISO from modiciaos.cloud
🔧 Write it to USB using Rufus or Balena Etcher
💻 Boot the live system on any compatible PC
🎉 Start creating — no installation, no subscriptions, no limits
foo_truepeak is a ITU-R BS.1770-5 compliant True Peak scanner. It can also scan ReplayGain, Loudness Range (LRA), Dynamic Range (DR), show the amount of clipping samples and report the position of highest peak.
For users primarily concerned with playback quality and simplicity, foo_truepeak can replace foobar2000’s ReplayGain and DR scanners. It uses modern loudness standards, detects true peaks and can write all relevant tags in a single pass. While its ReplayGain and DR values may not exactly match legacy scanners, they are more appropriate for real-world playback on modern systems.
In foobar2000, open File → Preferences → Components.
Click Install…, select the foo_truepeak.fb2k-component file.
Restart foobar2000 when prompted.
2. Disabling legacy scanners (optional but recommended)
To avoid confusion or duplicate workflows:
Don’t try removing the ReplayGain scanner as it’s built in.
You can uninstall foo_dr_meter and or foo_dynamic_meter.
This keeps foo_truepeak as your single analysis tool.
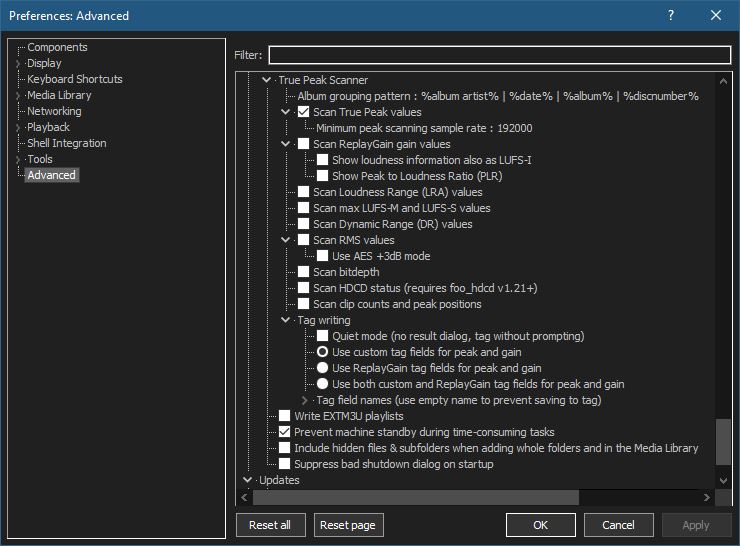
3. Open foo_truepeak preferences
Go to File → Preferences → Advanced →Tools → True Peak Scanner
4. Ensure the following is enabled
✔ Scan True Peak Values
True peak scanning accounts for inter-sample peaks created during digital-to-analog conversion, ensuring that peak levels reflect what a real DAC actually outputs, not just what is stored in the file.
5. Enable ReplayGain scanning
✔ Scan ReplayGain values
Notes:
Gains are derived from EBU R128 loudness, but written as ReplayGain tags.
Peaks are true peaks, not simple sample peaks.
Playback normalization works normally in foobar2000.
6. Enable Dynamic Range scanning
✔ Scan Dynamic Range (DR) values
Notes:
These values are analytical, not official TT DR Meter values.
They are suitable for comparison within your library, not for DR Database submissions.
7. Choose tag writing behavior
✔ Use ReplayGain tag fields for peak and gain
8. Run a True Peak scan
Select a track, tracks or albums in a playlist.
Right-click → True Peak Scan.
You can also create custom buttons on the toolbar for Album or Track scans.
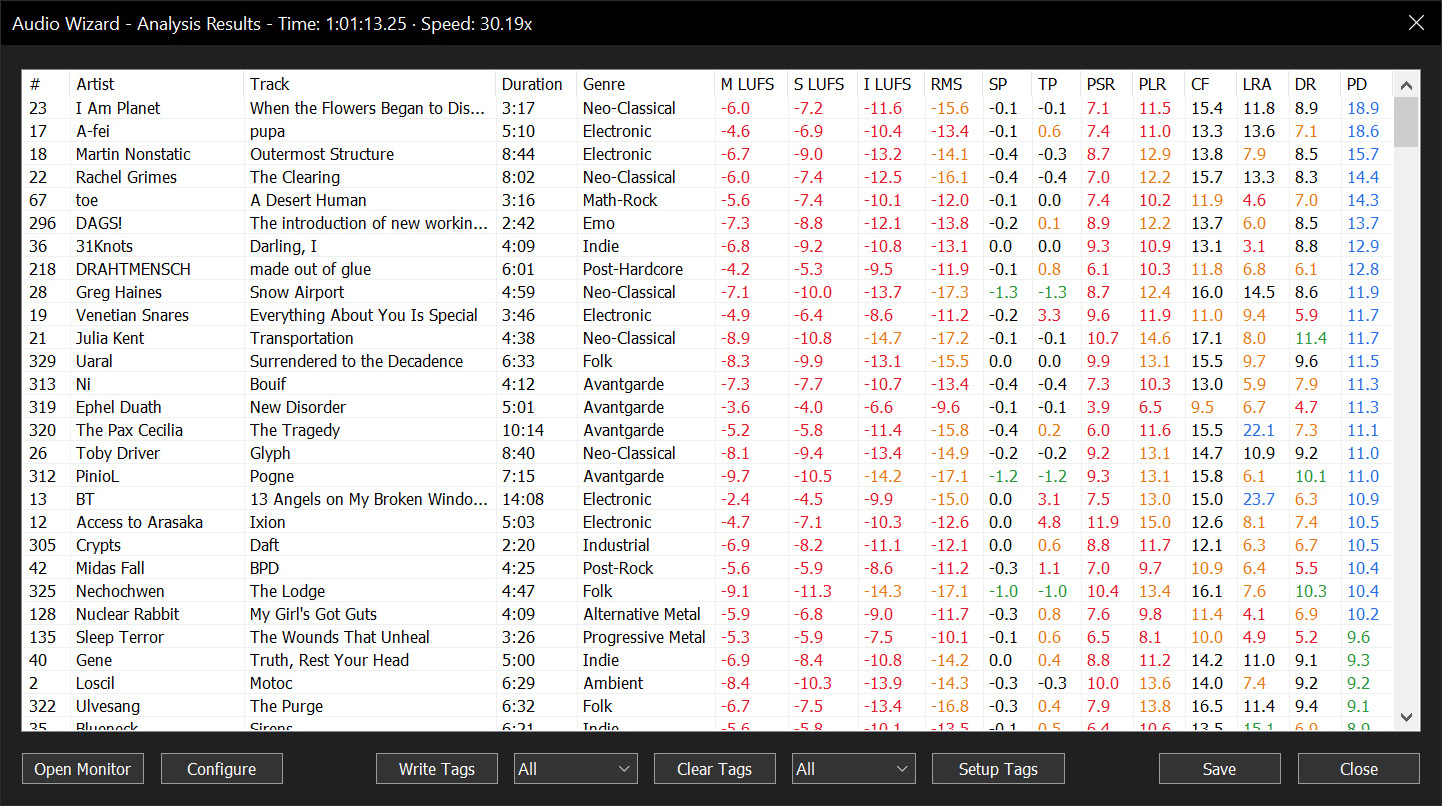
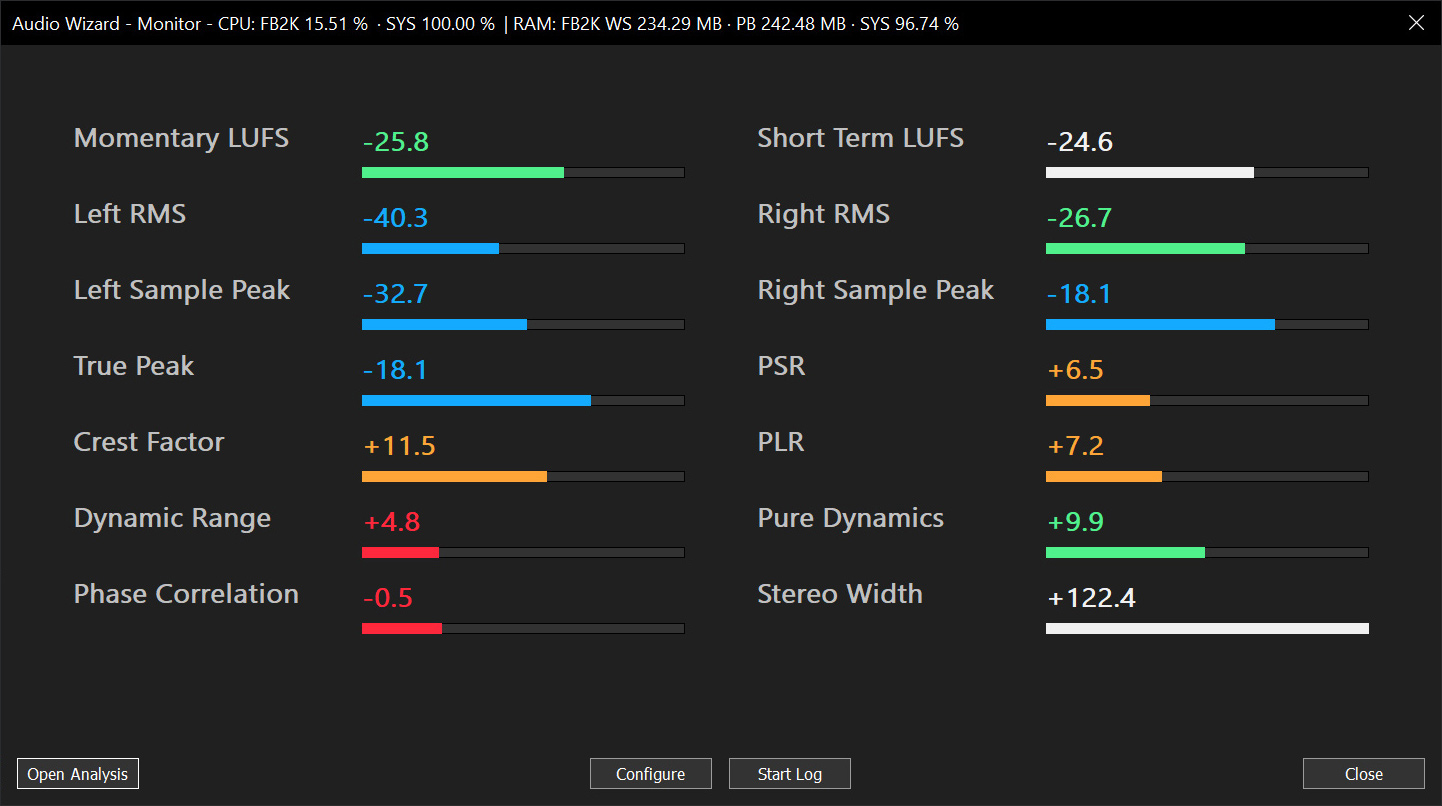
Audio Wizard (foo_audio_wizard) is a fiery chapter of The Wizardium, granting foobar2000 audiophiles and engineers tools for full-track analysis and real-time monitoring. Harness Pure Dynamics for psychoacoustic clarity.
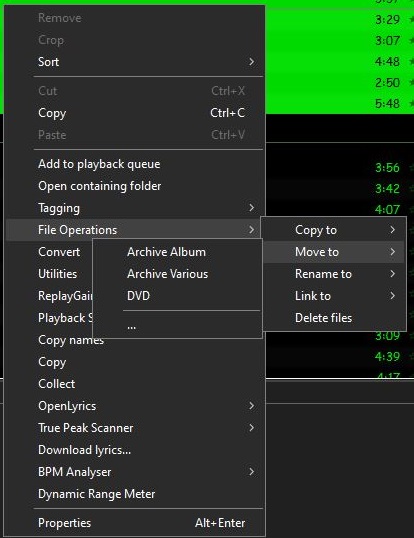
Using File Operations is both efficient and necessary. The library location of the your music is updated by the built in component foo_fileops. Albums are filed differently than compilations. Often users have a local library and a networked backup archive. File Operation Presets allow you to automate these procedures.
File Operations preset selection submenu
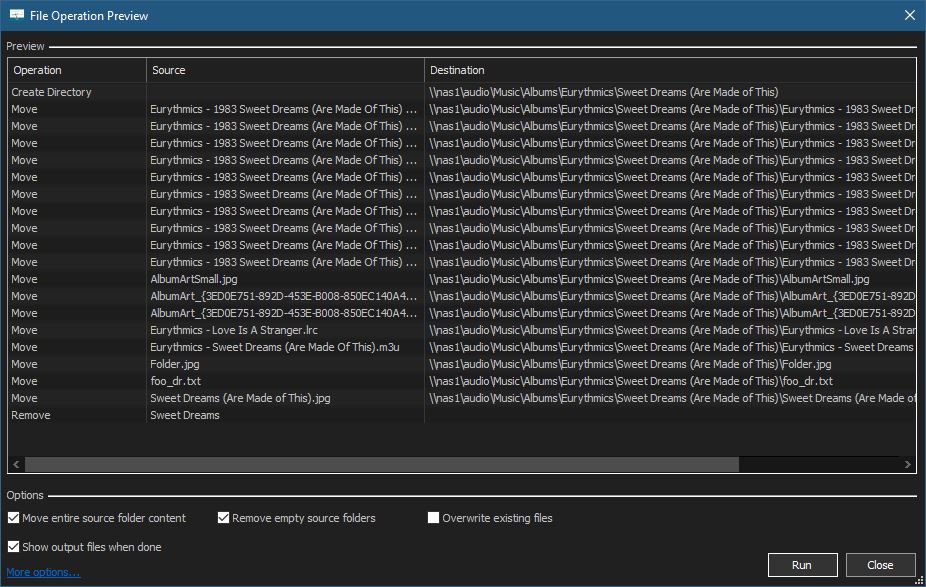
For instance, archiving an album:
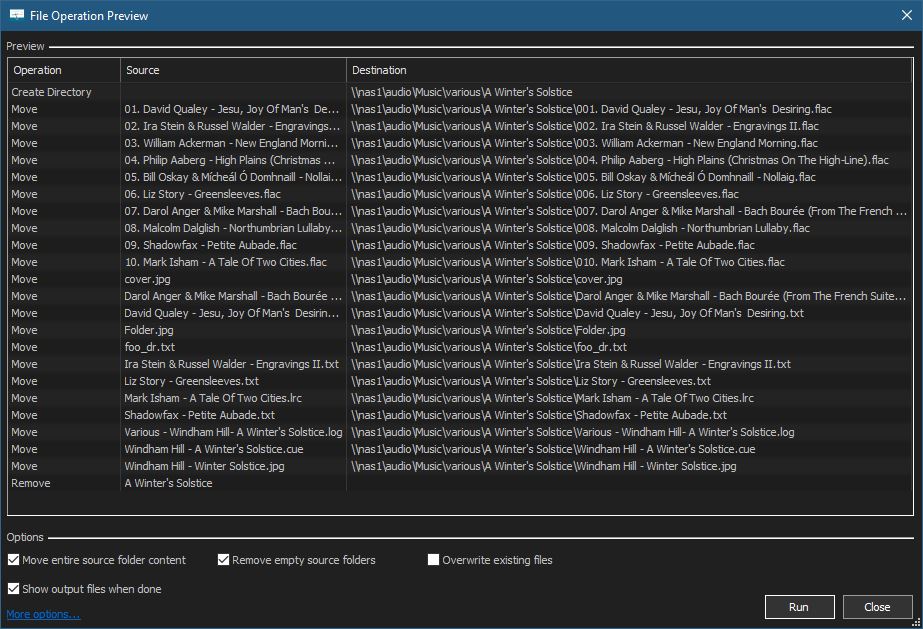
Or archiving a compilation:
Creating A File Operations Preset:
Select a song or an album
Right mouse click selection and select File Operations from menu
Select either Copy to or Move to
Select the ellipse …
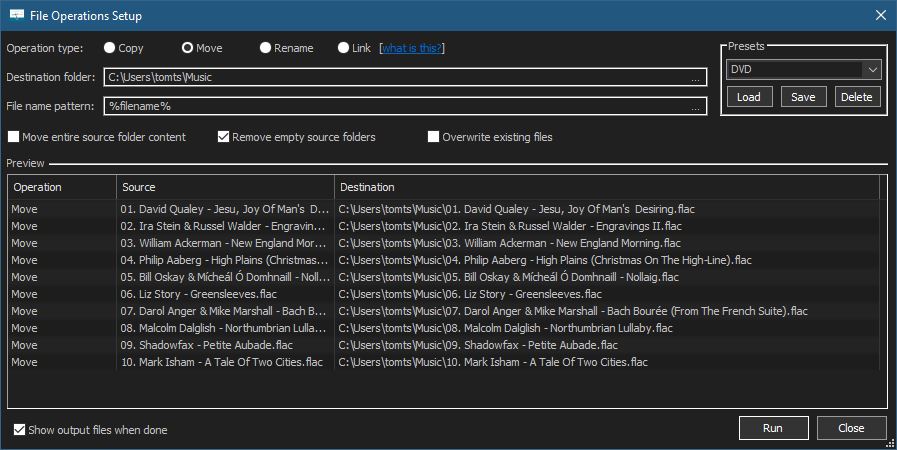
The File Operations Setup dialog is now displayed
6. Once you have selected a destination folder and selected any appropriate options, type a name for your preset in the Presets field and save it. 7. You can Run, modify (save) or delete existing presets from this form.
Cdparanoia is a Compact Disc Digital Audio (CDDA) Digital Audio Extraction (DAE) tool, commonly known on the net as a ‘ripper’. The application is built on top of the Paranoia library, which is doing the real work (the Paranoia source is included in the cdparanoia source distribution). Cdparanoia reads audio from the CDROM directly as data, with no analog step between, and writes the data to a file or pipe in WAV, AIFC or raw 16 bit linear PCM.
Cdparanoia is a bit different than most other CDDA extration tools. It contains few-to-no ‘extra’ features, concentrating only on the ripping process and knowing as much as possible about the hardware performing it. Cdparanoia will read correct, rock-solid audio data from inexpensive drives prone to misalignment, frame jitter and loss of streaming during atomic reads. Cdparanoia will also read and repair data from CDs that have been damaged in some way.
Cdparanoia is easy to use and administrate; It has no compile time configuration, happily autodetecting the CDROM, its type, its interface and other aspects of the ripping process at runtime. A single binary can serve the diverse hardware of the do-it-yourself computer laboratory from Hell.
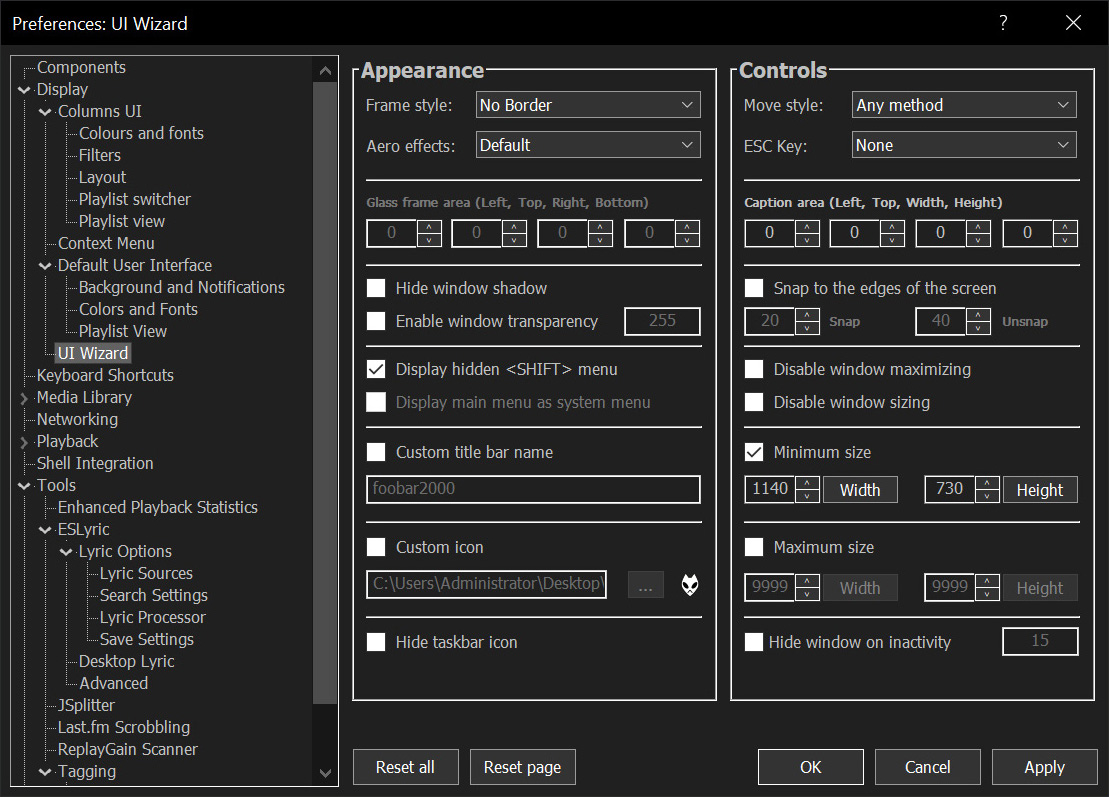
Sealed within the luminous Sapphiraz Sanctum, where ethereal interfaces shimmer in eternal twilight, the UI Wizard is a spellbinding chapter of The Wizardium’s grimoire. Its runic seal, the radiant ᛋ Sowilo, yields only to masters of window enchantment, reshaping foobar2000’s form with mischievous elegance — from glass-like Aero effects to borderless designs that defy mortal UI constraints.
Window Appearance Customization:
Supports multiple frame styles: Default, Small Caption, No Caption, No Border.
Configurable Aero effects: Default, Disabled, Glass Frame, Sheet of Glass.
Customizable window background color and transparency.
Optional custom window title and icon.
Configurable window shadow for borderless styles.
Window Behavior Control:
Adjustable window positioning and sizing with constraints (min/max width and height).
Customizable caption area for dragging with various move styles (e.g., mouse buttons, key combinations).
Snap-to-edge functionality with configurable snap and unsnap distances.
ESC key actions: None, Hide, or Exit.
Inactivity-based window hiding with customizable timeout.
Window State Management:
Toggle between Normal, Maximized, and Fullscreen states.
Option to disable window maximizing or resizing.
Automatic saving and loading of window position and size.
API: COM/ActiveX interface for scripting in foobar2000 via Spider Monkey Panel or JSplitter.