Clearly, the available literature prescribes balanced interconnection as the absolute best way to interconnect audio equipment. The use of entirely balanced interconnection with both ends of the shield connected to chassis ground at the point of entry provides the best available performance.
foo_discogs ~ Foobar2000 & Discogs
Greatly extend the information in your music files by using the foo_discogs component to tag albums with Discogs information. Once the additional Discogs release information is stored in the song tags, it’s possible to search for catalog numbers, secondary artists or studios, etc. You can now also create toolbar buttons which open the corresponding artist or release pages in Discogs, the artist’s own website or other links.
- download Discogs album and artist artwork
- retrieve more information than most taggers
- goes that extra length to make sure retrieved data is correct and well formatted
- flexible tag mapping allows you to write only what you want, where you want
- use meta-data in tags to display Discogs artist / label / release web pages
able to later update specified tags (useful in update ratings)

Album’s properties when tagged with Discogs info
Installing & Configuration:
- Install the foo_discogs component
- Select any song on any playlist
- Right click the song and select Tagging
- From the sub-menu select Discogs
- Now select Configuration
- Change any settings needed.
Tagging Files:
- Select an entire album on a playlist
- Right click the album and select Tagging
- Select Discogs
- Select Write Tags…
- Click Search then select the correct match and click Next
- Confirm that the tracks match the files and click Write tags
Your audio files should now be tagged with additional Discogs metadata.
Open Release Page Button:
- Right click on Foobar’s Toolbar area and select “Customise Buttons…“
- In “Available Commands” navigate to and select [context] > Tagging > Discogs > View Release Page
- Change Icon and then click “OK“
- Select a song, or album that has been tagged with Discogs metadata, and click the new custom button
References:
www.foobar2000.org/components/view/foo_discogs
hydrogenaud.io/index.php/topic,50523.0.html
Latest update:
github.com/ghDaYuYu/foo_discogs
bitbucket.org/fooDaYuyu/foo_discogs/downloads/
PeppyMeter ~ Linux Analog VU Meter
PeppyMeter is a software VU Meter written in Python. It was originally developed as the new ‘VU Meter’ screensaver for Peppy Player. With minor modifications it became a stand-alone application. PeppyMeter gets audio data from media players (e.g. mpd) via fifo and displays current volume levels in a Graphical User Interface in the form of a traditional VU Meter.
- Written in Python.
- Pygame library leveraged for UI purposes.
- UI is available in three resolutions 800×480, 480×320 and 320×240 pixels.
- The input for the program is the data from the named pipe. That signal should be provided by peppyalsa plugin.
- Supplies 9 default meters out of the box.
- Allows you to add your own meters.
- Open-source. All source files are available on Github.
- Several data sources are available for testing and tuning.
- Provides four types of output: Display, Serial, I2C and PWM.

github.com/project-owner/PeppyMeter.doc/wiki
github.com/project-owner/PeppyMeter
diyaudio.com/forums/pc-based/291010-peppymeter
M.R.O.: Headphone equalization
If a tonal linearity, natural head-phonic imaging, and Hi-Fidelity are what you’re looking for, search for headphones matching the above reference DF curve the most.… BTW, the most accurate DF equalized headphones in the market is ER-4 from Etymotic Research …
Source: M.R.O.: Headphone equalization
Foobar2000 ~ Playlist Viewers
Foobar2000 Playlist Viewers display the current playlist of songs. Different playlist viewers offer various capabilities such as formatting, grouping and visual options. A playlist viewer is usually the central panel and main focus of a Foobar2000 interface. Foobar2000 plays the next song of the current playlist unless the play order has been changed from default, to repeat, random or shuffle. There is a playback queue but it is not visible or used in normal operation.
- Default Playlist
- EL Playlist (Extended List Playlist / Eole Playlist, CUI)
- ES Playlist (Extended Simple Playlist, DUI)
- JS Playlist (jscript playlist for WSH PANEL MOD)
- mtpl Playlist (supports folders, playlist in playlist and sub-tracks)
- SimPlaylist (multiple grouping levels, album art, etc.)

Adding a custom column to a playlist view: (using play count as an example)
- When adding a column view in a playlist, you’ll need to define the column first.
- Navigate to
Preferences > Display > Default User Interface > Playlist View > Custom Columns - at the bottom of the custom columns windows, click “
Add new‘ - Name the Column “
Played‘ and%play_count%as the ‘pattern’ - click apply, ok
- Now right click the title bar of the playlist and select “
Columns” and make sure ‘Played‘ is selected (checkmarked) and that you can see the column in the playlist, it will be last but you can rearrange it.
Resources:
Paul Marshall Analog Audio Level Meters
These standalone audio level meter programs allow the optimum setting of input levels for various sound recording functions, particularly for video editing.

web.archive.org/web/20130627213637/http://www.darkwooddesigns.co.uk/pc2/meter
Highly accurate PP
VUMeter ~ Windows Analog VU Meter
Recommended Audio Forums
General:
- Audio Science Review
- AudioAsylum
- AudioKarma
- AVS – Audio
- Hydrogen Audio
- Sensible Sound / Hifi Answers
- Steve Hoffman Music
- The Audio Forums
Hardware:
Headphones:
EAC ~ Archiving CDs Losslessly
Exact Audio Copy, also known as EAC is often used to create an exact copy of a CD which can be stored in a digital media archive or audio library. The goal is to preserve all information from a CD, such that the CD can be recreated from an archive and / or is playable from an audio library.Β With EAC, the original audio files and a .cue file, an exact copy can be reburnt back onto a CDR; and with FLAC files, a compressed lossless music library may be built. Creating an individual folder which contains the album’s compressed audio files and a cue file is done via the following method:
- Open EAC and select the FLAC encoder
- Insert the CD you wish to archive
- If using the freedb or CTDB plugins, select the correct cover art
- You may also add lyrics to each track at this point
- Verify that the downloaded information is complete and correct
- Convert all CD information to title case

- Remove any extra spaces

- Detect the CD’s gaps

- Create the cue sheet and album folders

- Rip the CD in Burst Mode, which creates the individual audio files

- Switch to Secure Mode and re-rip tracks any tracks that did not rip accurately
This process also creates an EAC log file in the same folder.
Determining Which EAC Gap Detection Method To Use:
hydrogenaud.io/index.php/topic,115657.msg954261.html#msg954261
Sources:
wiki.hydrogenaud.io/index.php?title=EAC_Lossless_Backup
wiki.hydrogenaud.io/index.php?title=EAC_Configuration_Wizard
dbpoweramp.com/spoons-audio-guide-cd-ripping.htm
AcousticBrainz ~ Analyze Your Music
The AcousticBrainz project aims to crowd source acoustic information for all music in the world and to make it available to the public. This acoustic information describes the acoustic characteristics of music and includes low-level spectral information and information for genres, moods, keys, scales and much more. The goal of AcousticBrainz is to provide music technology researchers and open source hackers with a massive database of information about music. ~ AcousticBrainz
EAC ~ Using Configuration Profiles
Exact Audio Copy enables configuration profiles to be created and then loaded as needed. An example of this is switching between Burst and Secure extraction modes. The quickest way to switch between these two drive settings is to create two different drive configuration profiles, one for burst and one for secure. Using the profile switcher in the bottom information bar, or footer, allows instant switching between these two different extraction modes.
Clicking on the New button at the bottom of EAC brings up the Create New Profile dialog ~

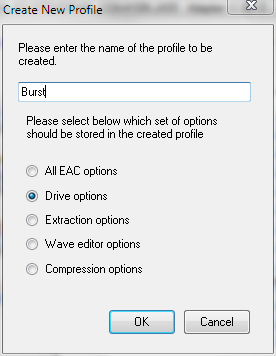
Add the name of the new profile, “Burst” and select the “Drive” option group. Repeat this procedure for another profile called “Secure”.
You should then have a Profile Selector that looks like this ~

The last step is to select each profile in turn and select the corresponding extraction method, either Burst or Secure, in the Drive Options – Extraction Method settings menu, and then click the Save button for each profile.
Best Dynamic Microphones Of All Time: The Top 6 List
Looking for some good dynamic mics to add to your locker? Well in this post, I reveal 6 of the greatest ones in music history. ~ Best Dynamic Microphones of all time: The Top 6 List


